Recreate access key
For the Cloud Backup service, the access key is similar to a password for authentication. The access key can only be created once; after that, it cannot be recovered and a new access key must be generated.
Some cases that require regenerating the access key:
- You created a machine but forgot to download the configuration file or copy the installation script.
- You accidentally modified the
agent.yamlconfiguration file containing the access key, causing the agent to be unable to connect to the machine. - You want to remove the connection from the agent of the old server to the machine.
Note: Before regenerating the access key, you need to stop the bizfly-backup service at the agent
- Stop service on Linux:
systemctl stop bizfly-backup
- Stop service on MacOS:
sudo launchctl stop bizfly-backup
- Stop service on Windows:
Quickly open Task Manager using the shortcut Ctrl + Shift + Esc

Once the bizfly-backup service is stopped at the agent, follow these instructions:
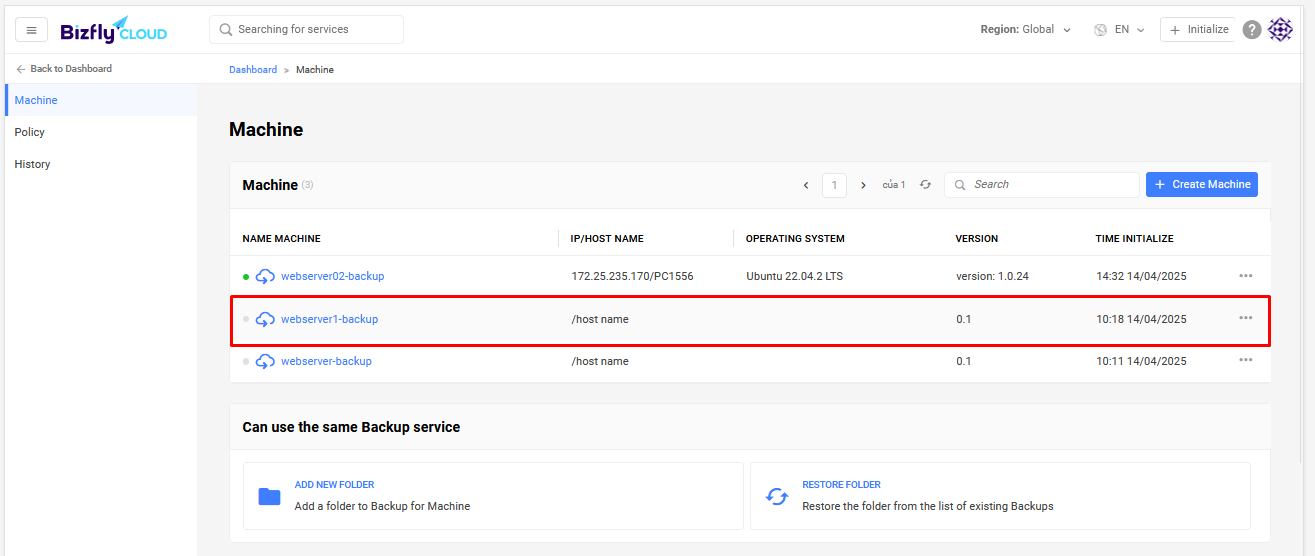
Step 1: Select the machine for which you want to recreate the access key:
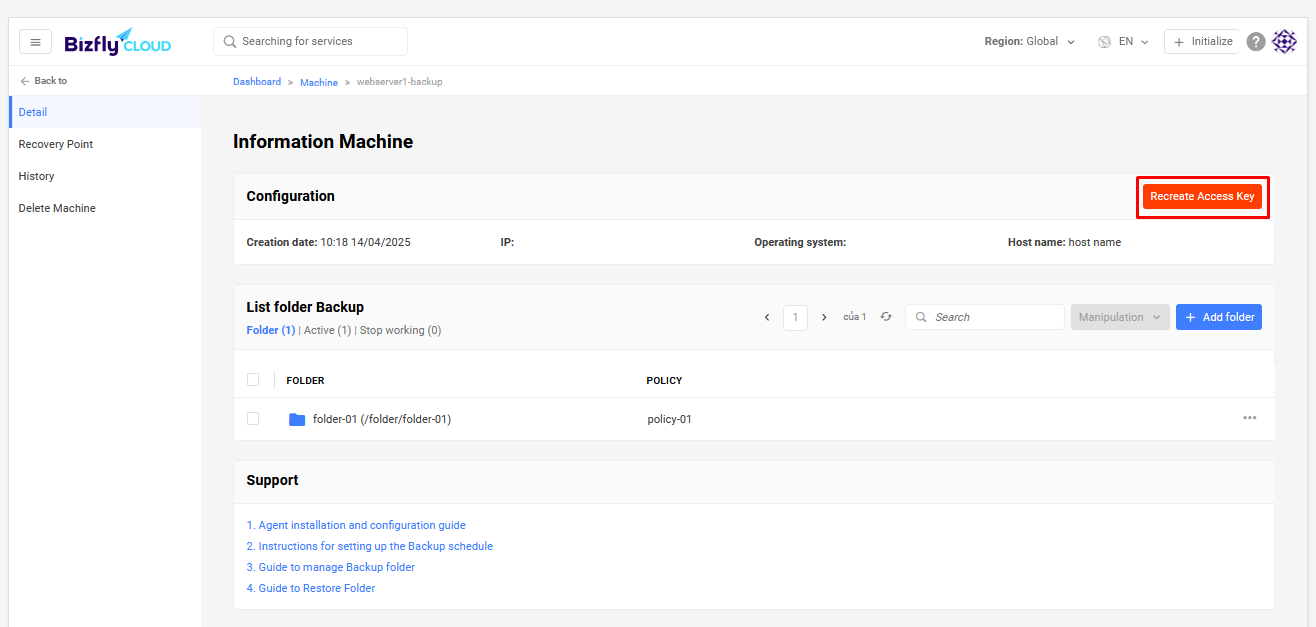
Step 2: Select Recreate Access Key:
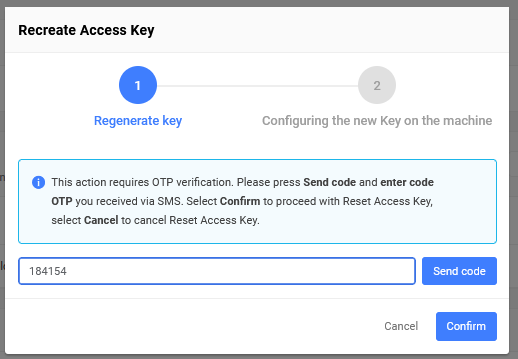
Step 3: Enter the OTP code and select Confirm. Note: When confirmed, the old access key will be revoked and can no longer be used:
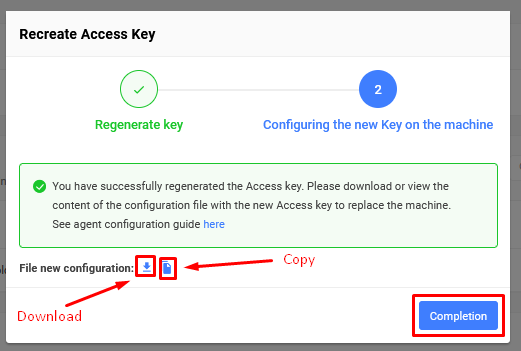
Step 4: A new configuration file containing the new access key will be generated. You can choose to download the configuration file or copy the contents of the configuration file to edit the agent.yaml file on the server:
The default agent.yaml file when installed via script is stored in the following locations on the server:
/etc/bizfly-backup/- for Linux and MacOSC:\Program Files\BizflyBackup\- for Windows
Step 5: Restart the service on the server after changing the configuration file. - Start service on Linux:
systemctl start bizfly-backup
- Start service on MacOS:
sudo launchctl start bizfly-backup
- Start service on Windows:
Quickly open Task Manager using the shortcut Ctrl + Shift + Esc
Case of forgetting to copy the installation script
- If you forget to copy the agent installation command from the dashboard, you will not be able to view it again. At this point, you need to regenerate the access key.
- When regenerating the access key, you will receive a
agent.yamlfile with the following content:access_key: <your_access_key> api_url: https://api-backup-hn.manage.bizflycloud.vn machine_id: <your_machine_id> secret_key: <your_secret_key> - You will replace the above information in the command to install:
- For Linux :
ACCESS_KEY=<your_access_key> \ API_URL=https://api-backup-hn.manage.bizflycloud.vn \ MACHINE_ID=<your_machine_id> \ SECRET_KEY=<your_secret_key> \ sudo -E bash -c "$(curl -sSL https://get.bizflycloud.vn/cloud-backup/linux.sh)"- Learn more: Agent installation guide for Linux
- For MacOS :
ACCESS_KEY=<your_access_key> \ API_URL=https://api-backup-hn.manage.bizflycloud.vn \ MACHINE_ID=<your_machine_id> \ SECRET_KEY=<your_secret_key> \ sudo -E bash -c "$(curl -sSL https://get.bizflycloud.vn/cloud-backup/macos.sh)"- Learn more: Agent installation guide for MacOS
- For Windows :
- Using Command Prompt :
powershell -Command ("Invoke-WebRequest -Uri https://get.bizflycloud.vn/cloud-backup/windows.ps1 -OutFile agent.ps1") && ^ powershell -ExecutionPolicy Bypass -File agent.ps1 ^ -ACCESS_KEY <your_access_key> ^ -API_URL https://api-backup-hn.manage.bizflycloud.vn ^ -MACHINE_ID <your_machine_id> ^ -SECRET_KEY <your_secret_key> - Using PowerShell :
powershell -Command ("Invoke-WebRequest -Uri https://get.bizflycloud.vn/cloud-backup/windows.ps1 -OutFile agent.ps1") ; ` powershell -ExecutionPolicy Bypass -File agent.ps1 ` -ACCESS_KEY <your_access_key> ` -API_URL https://api-backup-hn.manage.bizflycloud.vn ` -MACHINE_ID <your_machine_id> ` -SECRET_KEY <your_secret_key> - Learn more: Agent installation guide for Windows
- Using Command Prompt :
- For Linux :